Compose HotSwan Blog
Compose Preview Driven Development with Instant Feedback

April 11, 2026 · 10 min read

Photo by stewi @ Unsplash
Compose Preview is one of the most underused features in Jetpack Compose. Most developers write a few @Preview functions during early development, then forget about them as the project grows. The previews stop compiling, the parameters go out of date, and eventually the team stops writing them entirely. This is a missed opportunity. When used deliberately, Compose Preview becomes the foundation of a faster, more reliable UI development workflow.
In this article, you will learn how to structure Compose previews so they stay maintainable as your project grows, how to avoid the most common pitfalls that cause previews to break, and how to extend previews beyond the IDE into on device rendering and automated screenshot catalogs that serve as living documentation for your UI components.
What Preview Driven Development Means
Preview driven development is the practice of writing @Preview functions before or alongside the composables they represent, treating them as the primary way you see and verify your UI. Instead of running the full app, navigating to a screen, and setting up the right state manually, you define that state in a preview function and let the IDE render it for you.
This is not about replacing manual testing. It is about shortening the iteration loop for visual work. When you can see the result of your composable with specific data, in a specific configuration, without building the app, you make better design decisions faster. You also catch layout issues earlier, because you can preview edge cases (empty lists, long strings, RTL layouts) that you would normally skip during manual testing.
The difference is not just speed. The traditional workflow destroys your context on every iteration. You lose scroll positions, navigation state, form inputs, and in memory data. When you finally reach the screen you were working on, you are comparing your change against a freshly initialized app, not against the previous version. Preview driven development eliminates this by keeping the feedback loop entirely inside the editor.
There are several concrete benefits that compound over time:
- Immediate visual feedback. You see the composable with your exact data the moment you save. No build, no install, no navigation.
- Parallel state exploration. With
@PreviewParameter, you can render ten different states side by side in your Android Studio. Loading, empty, error, overflowing text, RTL. Manually testing each one would take minutes per iteration. - Architecture pressure. A composable that cannot be previewed is usually too tightly coupled. Writing previews naturally pushes you toward state hoisting, smaller components, and clearer interfaces.
- Documentation that stays current. Previews are executable. Unlike screenshots in a wiki or a Figma link, they cannot go out of date. If the model changes, the preview either updates or fails to compile.
Structuring Previews That Last
The most common reason previews break is that they depend on things they should not. A preview that creates a ViewModel, calls a repository, or reads from a database will fail in the preview environment because those dependencies are not available. The fix is state hoisting: separate the data from the rendering.
State hoisting for previewable composables
If your composable takes a ViewModel directly, it cannot be previewed without instantiating that ViewModel. Instead, extract the state into a data class or individual parameters and pass them in.
1@Composable
2fun ProfileScreen(viewModel: ProfileViewModel) {
3    val user by viewModel.user.collectAsState()
4    Text(text = user.name)
5    Text(text = user.bio)
6}
This composable takes a ProfileViewModel directly. To render it in a preview, the IDE would need to instantiate the ViewModel, which in turn needs its repository, network client, and possibly a database. None of these are available in the preview environment. The preview either fails to compile or crashes at runtime with a missing dependency error.
The fix is to move the ViewModel dependency up to the call site and pass only the data the composable needs to render.
1@Composable
2fun ProfileScreen(
3    name: String,
4    bio: String,
5    onEditClick: () -> Unit = {},
6) {
7    Text(text = name)
8    Text(text = bio)
9}
10
11@Preview
12@Composable
13fun ProfileScreenPreview() {
14    ProfileScreen(
15        name = "Jane Doe",
16        bio = "Android developer",
17    )
18}
The composable now takes plain values. The preview can supply them directly without any dependency injection, database, or network call. The ViewModel still exists at the call site in your actual screen, but the composable itself is decoupled from it.
Using LocalInspectionMode for conditional preview logic
Sometimes you cannot fully decouple a composable from its dependencies. Image loading with Coil or Glide is a common case: the image loader needs a context and network access, neither of which is available in a preview. You can use LocalInspectionMode to detect when the composable is running inside a preview and provide a placeholder instead.
1@Composable
2fun UserAvatar(imageUrl: String) {
3    if (LocalInspectionMode.current) {
4        // Preview mode: show a colored placeholder
5        Box(
6            modifier = Modifier
7                .size(48.dp)
8                .background(Color.Gray, CircleShape)
9        )
10    } else {
11        // Runtime: load the real image
12        AsyncImage(
13            model = imageUrl,
14            contentDescription = "Avatar",
15            modifier = Modifier.size(48.dp).clip(CircleShape),
16        )
17    }
18}
This pattern keeps the preview functional without pulling in the full image loading stack. Use it sparingly. If you find yourself adding inspection mode checks everywhere, it usually means the composable needs better state hoisting.
Preview Parameters and Variants
A single preview shows one state. Real composables need to handle many states: loading, empty, error, content with short text, content with very long text, RTL, dark theme. Compose provides @PreviewParameter to generate multiple previews from a single function.
1class UserPreviewProvider : PreviewParameterProvider<User> {
2    override val values = sequenceOf(
3        User(name = "Jane", bio = "Short bio"),
4        User(name = "A very long username that might overflow", bio = ""),
5        User(name = "", bio = "User with no name"),
6    )
7}
8
9@Preview
10@Composable
11fun ProfilePreview(
12    @PreviewParameter(UserPreviewProvider::class) user: User,
13) {
14    ProfileScreen(name = user.name, bio = user.bio)
15}
The IDE renders one preview for each value in the sequence. This is where preview driven development pays off: you see every edge case at once, side by side, without running the app.
Multi-configuration previews
You can combine preview annotations to test multiple dimensions at once. Font scale, dark mode, device size, and locale can all be specified in the @Preview annotation.
1@Preview(name = "Light")
2@Preview(name = "Dark", uiMode = UI_MODE_NIGHT_YES)
3@Preview(name = "Large Font", fontScale = 1.5f)
4@Preview(name = "Small Screen", device = "spec:width=320dp,height=640dp")
5@Composable
6fun ProfileScreenPreview() {
7    AppTheme {
8        ProfileScreen(name = "Jane Doe", bio = "Android developer")
9    }
10}
Each annotation produces a separate preview render. This is the fastest way to verify that your composable looks correct across configurations without touching a device.
Common Preview Anti-Patterns
Previews that work today but break tomorrow usually share one of these patterns.
- Previewing at the screen level. Screen composables tend to have many dependencies (ViewModels, navigation, DI). Preview individual components instead, and compose them in the screen without their own preview.
- Hardcoded theme without wrapping. If your composable uses
MaterialThemecolors or typography, wrap the preview in your app theme. Otherwise the preview uses default Material values and looks different from the real app. - Ignoring preview size. By default, previews wrap content. If your composable uses
fillMaxWidth(), the preview may collapse to zero width. Use@Preview(widthDp = 360)to give it a realistic container. - Outdated preview data. Preview parameters that use hardcoded strings like
"Lorem ipsum"do not reflect real usage. Use realistic data that matches your production models. When the model changes, the preview should fail to compile, which is a feature, not a bug.
Why avoiding these patterns matters
The benefit of preview driven development is not just seeing your composable without running the app. It is the compound effect over time. When every composable has a working preview, you spend seconds verifying a change instead of minutes rebuilding and navigating. You catch edge cases earlier because previewing empty states, long strings, and error conditions is trivial when you can render them all at once in your Android Studio.
Previews also act as a forcing function for better architecture. If a composable cannot be previewed, it usually means its dependencies are too tightly coupled. The act of making something previewable pushes you toward state hoisting, smaller components, and clearer interfaces. Your composables become more reusable and testable as a side effect.
For teams, previews serve as living documentation. New team members can open any composable file and immediately see what it looks like with realistic data, without setting up accounts, test databases, or navigating through the app. Designers can review visual states directly in the code instead of waiting for a deployed build. The previews stay current because they are compiled alongside the code they describe.
The anti-patterns listed above are the main reasons teams abandon previews. Fixing them is not extra work. It is the same work you would do to write well structured composables. The previews are a byproduct of good architecture.
The Preview Rebuild Problem
There is one significant friction point in the workflow described above. Every time you change a composable, the IDE needs to recompile the preview module to re-render it. On a small project this takes a few seconds. On a large multi-module project, it can take 30 seconds or more. During that time, you are staring at a loading spinner instead of looking at your UI.
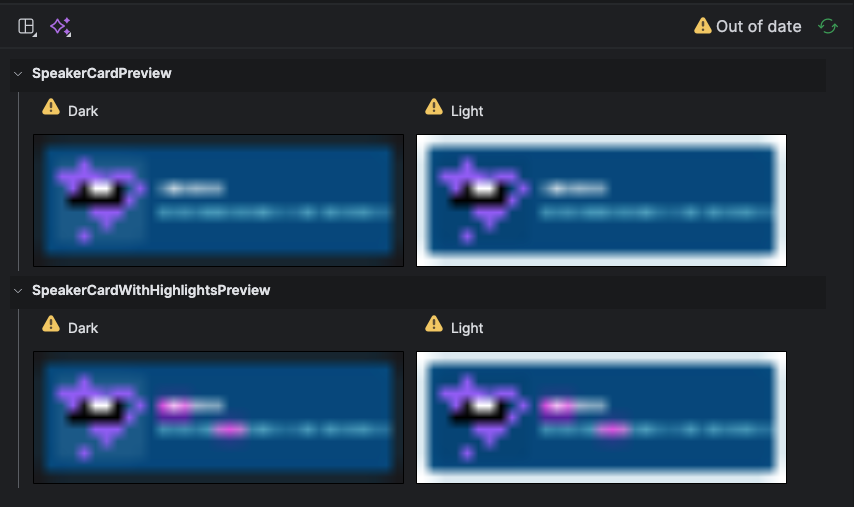
It gets worse. Previews are fragile. A simple change to a strings.xml value, a color resource update, or even a minor refactor in a dependency can cause every preview in the module to show the "out of date" banner. The only way to fix it is a full rebuild. On a large project, that means waiting minutes just to see the result of changing a single string.
If you are curious about why Compose Preview works this way internally, the Compose Preview Internals article covers the rendering pipeline in detail.
This is the gap between the idea of preview driven development and the reality. The workflow is correct in principle: write previews, iterate visually, verify edge cases. But the rebuild time and frequent "out of date" states undermine the iteration speed that makes the workflow attractive in the first place.
The IDE preview also has another limitation: it renders in a simulated environment, not on a real device. This means certain behaviors (hardware-accelerated rendering, real font metrics, system chrome) may look different from what your users actually see. For most composables this difference is negligible, but for pixel-sensitive work it matters.
Running Previews on a Real Device
Compose HotSwan includes a Preview Runner that solves both problems. It renders your @Preview composables on the actual connected device or emulator, using the same hot reload infrastructure that powers live code editing. There is no rebuild step. The preview appears on device in under half a second.
The workflow is straightforward. Your app runs on the device as usual. When you click the gutter swan icon next to any @Preview function, HotSwan launches a lightweight Activity in the same process that renders only that composable. Because it runs in the same process, all your dependencies (Hilt, Koin, network clients, databases) are available. No mocking needed.
This means your preview renders with real device fonts, real hardware-accelerated rendering, and real system chrome. What you see is exactly what your users will see. And because it uses hot reload, editing the composable and clicking the gutter swan icon again shows the updated preview immediately.
The Preview Runner also supports @PreviewParameter providers. Parameter values are resolved automatically via reflection, so you can preview all your variants on a real device with a single click.
The Preview Runner requires the Compose HotSwan IDE plugin (free to install from JetBrains Marketplace) and the Gradle compiler plugin. The screenshot catalog (captureAllPreviews) works with just the Gradle plugin, no IDE plugin needed, and is free to use with no license required. Add the Gradle plugin and preview library to get started:
Define the HotSwan compiler plugin in your version catalog so it can be referenced across modules.
1[plugins]
2hotswan-compiler = { id = "com.github.skydoves.compose.hotswan.compiler", version = "1.3.7" }
Register the plugin in the root build script without applying it, so submodules can apply it individually.
1alias(libs.plugins.hotswan.compiler) apply falseApply the plugin and add the preview library in your app module.
1plugins {
2    alias(libs.plugins.hotswan.compiler)
3}
4
5dependencies {
6    debugImplementation("com.github.skydoves.compose.hotswan:preview:<version>")
7}Automated Screenshot Catalogs
Individual previews are useful during development. But as a project grows, you want a way to see all your previews at once, compare them, and share them with designers and QA. This is where automated screenshot catalogs come in.
HotSwan provides a captureAllPreviews Gradle task that scans your entire project for @Preview functions, renders each one on a connected device, captures a screenshot, and generates a browsable HTML catalog. The result is a self-contained webpage that anyone on the team can open in a browser.
The HTML catalog includes search, dark/light theme toggle, module grouping, and fullscreen image viewing. For each preview, it shows the composable name, source file, module, and the device it was rendered on. You can use this as a visual regression reference, a design review artifact, or a component library that stays in sync with your code.
Running it
With a connected device or emulator running, execute the Gradle task:
1./gradlew captureAllPreviewsThe output goes to .hotswan/preview-captures/ in your project root. Open index.html in any browser. For previews that load images or async content, you can set a per-preview render delay:
1@PreviewScreenshot(renderDelay = 5000)
2@Preview
3@Composable
4fun NetworkImagePreview() {
5    UserAvatar(imageUrl = "https://example.com/photo.jpg")
6}
CI integration
The task works in CI environments. Unlike JVM based screenshot tools that approximate Android rendering, this runs on a real Android emulator in CI. The screenshots you get are identical to what your users see on their devices. With GitHub Actions and android-emulator-runner, you can capture every preview on every pull request, generate a self-contained HTML catalog, and deploy it to GitHub Pages so the entire team (designers, QA, product managers) can browse your component library from a URL without touching Android Studio. Here is a GitHub Actions workflow example:
1name: Preview Catalog
2on:
3  push:
4    branches: [main]
5
6jobs:
7  capture:
8    runs-on: ubuntu-latest
9    steps:
10      - uses: actions/checkout@v4
11      - uses: actions/setup-java@v4
12        with:
13          distribution: zulu
14          java-version: 17
15
16      - uses: reactivecircus/android-emulator-runner@v2
17        with:
18          api-level: 34
19          script: ./gradlew captureAllPreviews
20
21      - uses: actions/upload-artifact@v4
22        with:
23          name: preview-catalog
24          path: .hotswan/preview-captures/
25
26      # Deploy to GitHub Pages
27      - uses: peaceiris/actions-gh-pages@v4
28        with:
29          github_token: ${{ secrets.GITHUB_TOKEN }}
30          publish_dir: .hotswan/preview-captures
You can see a working example of this in the Pokedex Compose CI workflow, which generates a preview catalog on every build.
For the full CI setup guide with a GitHub Actions workflow example, see the Preview Screenshot docs.
Choosing the Right Screenshot Tool
Paparazzi and Roborazzi render composables on the host JVM using a layout rendering engine. This means they run without a device or emulator, which makes them fast and easy to set up in CI. They are well suited for golden image regression testing where you want to detect pixel level differences between builds.
HotSwan takes a different approach. It renders on the actual Android device or emulator. The screenshots match what users see because they come from the same rendering pipeline that draws the UI on screen. This matters for composables that use custom drawing, platform specific typography, or hardware accelerated animations, where JVM approximation can produce different results.
Because HotSwan runs in the actual app process, it does not just render the UI shell. Image loading, network responses, database queries, and any other runtime behavior execute exactly as they would in production. The captured screenshots include the full device screen with system bars (status bar, navigation bar), which is useful when you need to verify how your UI integrates with the system chrome. If you need that level of fidelity in your preview screenshots, real device rendering is the way to go.
| HotSwan | Paparazzi / Roborazzi | |
|---|---|---|
| Rendering | Real device or emulator | Host JVM approximation |
| System bars | Included (status bar, navigation bar) | Not included |
| Runtime behavior | Full (image loading, network, database) | UI shell only |
| Test code required | None. Scans @Preview automatically | Test class per composable |
| Output | Image files + searchable HTML catalog | Image files |
| Best for | Visual cataloging, documentation, design review | Pixel level regression testing |
| CI setup | Emulator required | No emulator needed |
The two approaches are complementary, not competing. If your priority is fast regression testing with golden image comparison and no emulator overhead, Paparazzi or Roborazzi is the right choice. If you want a browsable component catalog with real device rendering that the whole team can access, HotSwan fills that role. You can use both in the same project for different purposes.
Putting It All Together
Preview driven development is not a single tool or technique. It is a combination of practices that reinforce each other:
- Write previews alongside your composables. Every composable that takes parameters should have at least one preview. Use
@PreviewParameterproviders to cover edge cases. - Hoist state out of composables. If a composable cannot be previewed without a ViewModel or dependency, refactor it. The preview requirement is a forcing function for better architecture.
- Use the Preview Runner for pixel-accurate feedback. When the IDE preview is not enough, click the gutter swan icon to see your composable on a real device with zero rebuild time.
- Generate screenshot catalogs in CI. Run
captureAllPreviewson every pull request. Use the HTML output as a visual review artifact that the whole team can access.
The result is a workflow where you rarely need to run the full app to verify UI changes. Previews handle the fast iteration. The device runner handles pixel accuracy. The catalog handles team visibility and regression tracking. Each layer builds on the one below it.
Conclusion
Compose Preview is not just a convenience feature in your Android Studio. When used as the primary feedback mechanism for UI development, it shortens the iteration loop from minutes to seconds, catches edge cases earlier, and produces artifacts that the whole team can use. The key is structuring your composables so previews stay maintainable: hoist state, use preview parameters, wrap in themes, and keep preview data realistic.
The gap between Android Studio previews and real device rendering has historically been a limitation. Tools like HotSwan's Preview Runner and captureAllPreviews close that gap by rendering on the actual device without a rebuild step. This turns previews from a development-time convenience into a team-wide quality tool that works in CI, serves as documentation, and matches production rendering exactly.
If you are building with Jetpack Compose and not writing previews deliberately, start with one composable. Hoist its state, write a preview with realistic data, and see how quickly you can iterate on it without running the app. That experience is usually enough to change how you approach every composable after it.
As always, happy coding!